How to Set Up a Simple Art Space at Home (Even If You Don’t Have a Craft Room)
You do not need a beautiful art studio, a dedicated craft room, or one of those suspiciously organized walls of perfectly coordinated supplies to make art at home.
I know because for years, my creative space was basically a 3×3-foot corner of my old house.
Was it glamorous? No.
Did I make a lot of art there? Absolutely.
Over the years, both as an artist and through setting up Artvana painting experiences just about anywhere we can fit a row of easels, I’ve learned that creativity doesn’t actually require much real estate.
Sometimes the biggest obstacle isn’t having enough space. It’s all the little steps between “I feel like making something” and actually making it.
Where are the brushes? Do I have paper? Where did I put that pencil case? Can I use the dining room table? Is someone currently eating at the dining room table? Will anyone become upset if the dining room table remains an art studio until Thursday?
The best home art space isn’t necessarily the prettiest one.
It’s the one that makes it easy to start.
This post contains affiliate links. If you purchase through one of these links, Artvana may earn a small commission at no additional cost to you. I only recommend products and types of supplies that I genuinely think are useful for making creativity easier.
So, what do you actually need to create an art space at home? A protected work surface, decent lighting, a small collection of supplies you enjoy using, somewhere to store them, and enough room to comfortably create. That’s really it.
Start With the Space You Already Have
Before you buy anything, look around your home.
You may already have an art studio. It just currently goes by another name.
The dining room table. The kitchen island. A desk. A folding table. The end of a counter. That weird little corner nobody has figured out what to do with yet.
All perfectly respectable art studios.
Your kitchen island can absolutely become a painting table for the afternoon—assuming your roommates, partner, children, or other governing authorities agree.
And I am living proof that you can get quite a bit done in a 3×3-foot corner.
If you don’t have room for a permanent creative space, don’t worry about creating one. Instead, think about creating a setup that can appear when you want to make art and disappear when everyone needs the kitchen back.
That means keeping the things you use most together, having somewhere comfortable to work, and making setup and cleanup as painless as possible.
Protect the Table and Save Yourself the Stress
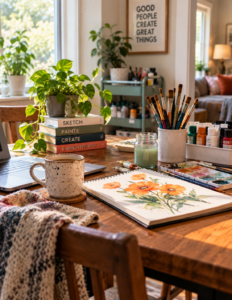
This isn’t the glamorous part of making art, but it might be one of the most important.
Protect your work surface.
It’s difficult to relax into a painting when part of your brain is screaming, Do not get blue paint on the table. Do not get blue paint on the table.
A reusable table covering or washable craft mat is great if you create regularly. For particularly messy projects, an inexpensive disposable tablecloth works too.
View my Reusable table covering or craft mat pick
If your art studio doubles as your dining room, being able to fold up your table protection when you’re finished is especially helpful.
Because eventually someone is probably going to want to eat there.
Keep Your Everyday Art Supplies Together
Art supplies apparently have the ability to teleport.
You can own twelve pencils and still somehow find zero pencils when you sit down to draw.
One of the easiest ways to make creating at home more accessible is to keep the supplies you use most often together.
You don’t need an elaborate organizational system. A portable art caddy, pencil case, handled organizer, basket, or small container can be enough.
View my favorite Portable art organizer or pencil case
The goal isn’t to have an art setup worthy of an organization show.
The goal is to be able to think, I want to make something, grab your supplies, and start before your brain has time to suggest doing laundry instead.
This is the same reason I love keeping a small set of portable supplies for traveling. If you want to see what I actually like bringing with me, take a look at Art Supplies for Travel: My Favorite Supplies for Creating on the Go.
Read Art Supplies for Travel HERE
Build a Small Art Kit You’ll Actually Use
Art stores are dangerous places for creative people.
Suddenly you’re standing there holding seventeen brushes and an art medium you’ve never tried before, completely convinced that all of them are essential to your artistic development.
They’re probably not.
You can create a lot with a surprisingly small collection of supplies.
If you’re starting from scratch, your basic home art kit could be as simple as:
- Sketchbook or mixed-media paper
- Pencil and eraser
- A couple of drawing pens
- Paint or oil pastels
- A few brushes
- A palette
- Water cup
- Rag or paper towels
That’s plenty.
You can always add things as you discover what you actually enjoy using.
Start With a Sketchbook
I love sketchbooks because they remove some of the pressure that comes with a blank canvas.
Not every page needs to become something frame-worthy.
Sketch. Test colors. Draw something sitting on your kitchen counter. Paint the view outside. Make something terrible. Turn the page.
That’s what a sketchbook is for.
View my Favorite sketchbook (I like this one for the top end spiral)
And because it’s easy to grab and doesn’t require much setup, it’s also one of the simplest ways to sneak more creativity into everyday life.
Keep a Few Good Drawing Pens Nearby
Good drawing pens are another easy win because they require virtually no setup.
Open sketchbook. Remove cap. Make line.
We’re creating.
I like Micron pens for sketching and adding fine details, and they’re small enough to keep in a pencil case or take along when you travel.
View Micron pens Here | A good variety to get you started
Pick One Color Medium You Actually Like
You don’t need acrylics, watercolor, gouache, markers, colored pencils, oil pastels, chalk pastels and whatever exciting new thing the internet convinced you to buy at 11:30 last night.
Choose something you’re excited to use.
I personally love oil pastels, especially when I want something colorful without a lot of setup. They’re easy to grab, portable, and you don’t need water or a pile of additional equipment to start creating.
View the Oil pastel set here | A big affordable pack with SO many colors!
If paint is what makes you happy, choose paint.
The best art supply isn’t necessarily the fanciest one. It’s the one that makes you want to use it.
Give Your Supplies Somewhere to Live
Once your art-supply collection starts multiplying—and somehow it always does—you’ll need somewhere to put everything.
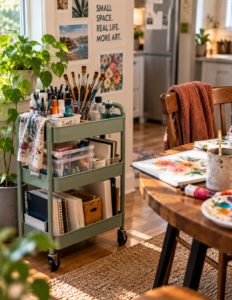
For a small space, I really like the practicality of a rolling cart.
Paper and sketchbooks can live on one level. Paints, pastels, or other mediums can live on another. Brushes and everyday tools can stay somewhere easy to reach.
My favorite Rolling art-supply cart
When you’re ready to create, roll it over.
When you’re finished, roll it away.
Congratulations. You now have a mobile art department.
Clear storage bins can also be useful if your supplies need to live inside a closet or cabinet. Being able to see what’s inside saves you from opening six different boxes while muttering, I know I own this.
Keep Brushes, Pens and Pencils Where You Can See Them
Small art supplies disappear particularly well.
Brushes, pencils, pens and other frequently used tools are often easier to manage when they’re upright and visible instead of buried in a drawer.
A simple brush cup, divided container, or desktop organizer works.
View my pick for Brush or desktop organizer
Again, it doesn’t need to be fancy.
I particularly don’t like brush organizers that feature many different sized holes. Organizers or cubes that are too light, they will tip over with heavier or longer brushes. You want something fairly heavy so it can support a number of different items, and something tall enough so your brushes don’t fall out.
There are plenty of things in your house capable of holding a paintbrush without being officially marketed as a Premium Artist Brush Organization Solution™.
Use what works.
You Probably Don’t Need a Fancy Palette
Your paint palette does not need to be expensive.
A basic reusable palette works. Palette paper works. Depending on the medium you’re using, other washable surfaces can work too.
What matters is having enough room to comfortably mix your colors.
View Simple reusable paint palettes
The important part is cleaning it when you’re finished instead of thinking, I’ll get that later.
WRONG! Did I get you there? I am actually a firm believer that when you are using acrylic paint on a plastic palette of any kind, let it dry and peel it off later, it peels off so easily, any remains can easily be scrubbed off but peeling off the dry flexible paint is sort of satisfying.
Have a Dedicated Paint-Water Cup
Please don’t make your favorite coffee mug your paint-water cup.
You know where this is going.
Keep one inexpensive cup or container with your art supplies and designate it for painting.
It should be sturdy enough that you’re unlikely to knock it over and, ideally, different enough from your drinking glass that you never accidentally discover what paint water tastes like.
That’s one artistic experience we can all skip.
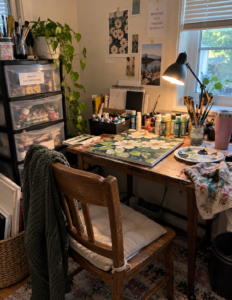
Don’t Underestimate Good Lighting
If you have access to natural light, use it.
A table or little workspace near a window can make a wonderful temporary art area.
But if you tend to create in the evening—or live somewhere where daylight occasionally seems to clock out at 4:00 p.m.—an adjustable task light can make a big difference.
View a great Adjustable task light here
You don’t need professional studio lighting.
You just need enough light to comfortably see your colors and details without leaning six inches away from your artwork wondering whether that paint is blue or green.
Keep Cleanup Supplies Nearby
This sounds ridiculously simple because it is.
Keep a rag, paper towels, and whatever you regularly use to clean your work surface somewhere near your art supplies.
The fewer steps there are between finishing your artwork and cleaning everything up, the more likely you are to actually do it.
Which brings us to…
The Five-Minute Art-Space Reset
This may be one of the most useful habits you can build if your art space isn’t permanent.
Before you walk away, give yourself five minutes.
Clean the brushes. Toss the trash. Wipe the palette, or don’t. Close the paints. Put your pens and pencils back. Wipe down your surface. Return everything to its cart, case, basket, or tiny corner of creative chaos.
Done.
If your temporary studio is also where your household eats dinner, this step becomes particularly important.
Apparently, some people object to dining next to open paint water and seventeen uncapped markers.
Your Art Space Doesn’t Have to Be Instagram-Worthy
There is a strange pressure to believe that before we can start doing something creative, we need to build the perfect environment for it.
We don’t.
Maybe you have an entire room dedicated to art.
Maybe you have a rolling cart and half of the dining room table.
Maybe everything you own fits inside one pencil case.
Maybe, like I did for years, you have approximately nine square feet and determination.
It all counts.
Your creative space doesn’t need to impress anyone. It just needs to make it a little easier for you to sit down and make something.
Start with the space you have.
Protect the table.
Keep the supplies you actually use within reach.
Make cleanup easy.
And don’t wait until you have the perfect studio.
Make something where you are.
My Simple At-Home Art Essentials
If you’re putting together your own creative space, you don’t need to buy everything at once. These are the kinds of practical supplies I’d start with—the things that make it easier to actually sit down and create.
Favorite Sketchbook
A low-pressure place to sketch, experiment, practice and make whatever you feel like making that day.
View
Micron Pens
Great for sketching, outlining and adding smaller details without needing any setup.
View
Oil Pastels
Colorful, portable and one of my favorite options when I want to create without getting out an entire painting setup.
View
Portable Art Organizer or Pencil Case
Keep the supplies you reach for most in one place so you don’t spend your creative time looking for them.
View
Rolling Art-Supply Cart
Especially useful if your art studio needs to magically transform back into a dining room later.
View
Reusable Table Protection
Not exciting. Extremely useful. Your furniture will thank you.
View
Simple Reusable Palettes
You don’t need anything fancy—just enough room to mix colors comfortably.
View
Adjustable Task Light
A helpful addition if nighttime is when you finally get a chance to create.
View
Frequently Asked Questions About Creating an Art Space at Home
How do I make an art space at home with no extra room?
You don’t need a dedicated room to create an art space at home. A dining table, kitchen island, desk, rolling cart, or even a small corner can work. Keep your most-used supplies together in a portable container so you can quickly set up your art space and put it away when you’re finished.
What do I need for a basic home art space?
Start with a protected work surface, good lighting, a sketchbook or paper, pencils or drawing pens, your favorite color medium, a few brushes if you paint, a palette, and a dedicated water cup. You can add more supplies as you discover what you actually enjoy using.
How can I store art supplies in a small space?
Rolling carts, portable art caddies, pencil cases, clear storage bins, and desktop organizers are all useful for small-space art supply storage. Keeping similar supplies together also makes it easier to set up and clean up your temporary art space.
Can I use my dining table as an art space?
Absolutely. Protect the surface with a reusable craft mat or table covering and keep your supplies portable so the table can return to normal when you’re finished. Assuming, of course, the other people in your house eventually want the dining table back.
How do I make it easier to create art more often?
Reduce the amount of setup required. Keep a small group of favorite supplies together, choose an easy-to-access work surface, and reset your art space after each session. When creating only requires a few minutes of setup, you’re much more likely to actually do it.
Do I need an easel to make art at home?
No. Many types of art can be created comfortably on a table or desk. An easel can be useful for certain painting styles, but it isn’t necessary for building a functional home art space.